Sending custom events to Azure Event Grid


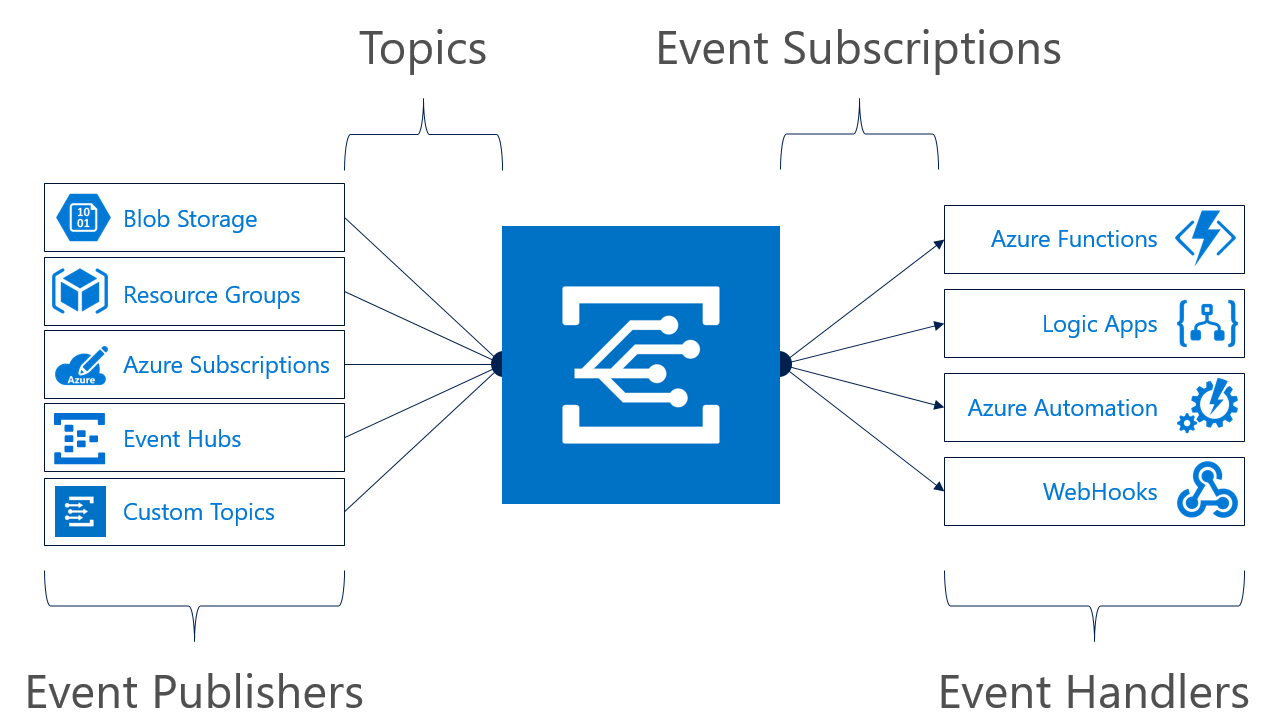
Azure Event Grid is a new managed service that was recently released for public review, so I thought I'd take some time out to give it try. It's essentially a cloud scale event routing service, which comes in pretty handy if you're building reactive applications. Publishers will be generating events on one side, handlers responding to events on the other side, and Event Grid in the middle making sure that your events are reliably delivered.
What's exciting about this new service, and probably where you'll get the most value, is how deeply it's integrated into the DNA of the Azure platform. Imagine being able to react to events that get fired when something changes in any of your Azure resources. You can opt in to be notified when a file gets added to Blob storage or a new user gets added to Azure AD. Then, you can have these events trigger an Azure Function App or kick off a serverless workflow with Azure Logic Apps. The combinations you can put together are virtually endless.
In this post, we're going to see what it takes to publish your own custom events to Event Grid. This will give us a good understanding of what's going on and how to incorporate this service into your code.
Creating an Event Grid Topic
The first thing that we'll do is create an Event Grid topic. Topics are where publishers send outgoing events to and where subscribers listen for incoming events.
To create a topic, you'll need the topic name, location and the resource group. In the Azure portal, you can search for and create an Event Grid Topic. If you have the Azure CLI installed, you can quickly create a topic on the command line.
az eventgrid topic create --name <topic-name> -l westcentralus -g <resource-group>
While the Event Grid is in preview, you'll have to create your topic in westus2 or westcentralus locations.
Defining custom events
Whether you're working with custom or built-in events, there are some manditory fields that you'll expect see in every event.
- Id - The unique ID for event.
- Subject - Any name or label that would have meaning for your application. This would be a good place to put the name of the service/entity that the event is related to.
- EventType - A value you can create filters against, e.g. CustomerCreated, BlobDeleted, HttpRequestReceived, etc.
- EventTime - The timestamp for when the event happened in the publisher.
- Data - Relevant information that's need to act on this event. This field is optional.
With topics, there is an implicit expectation from the subscriber that certain event types published to a given topic will adhere to a given schema. Think of the event type as contract between publisher and subscriber. If a Blob storage event fires, you might expect that there's some contextual information about the file that was altered.
Here's a simple class in C# that we'll use to model our custom events.
public class GridEvent<T> where T : class
{
    public string Id { get; set; }
    public string Subject { get; set; }
    public string EventType { get; set; }
    public T Data { get; set; }
    public DateTime EventTime { get; set; }
}
Handling events with Azure Functions
The next thing we'll need to do is create an endpoint that will receive and process our custom event. Today, the Event Grid preview supports webhook endpoints.
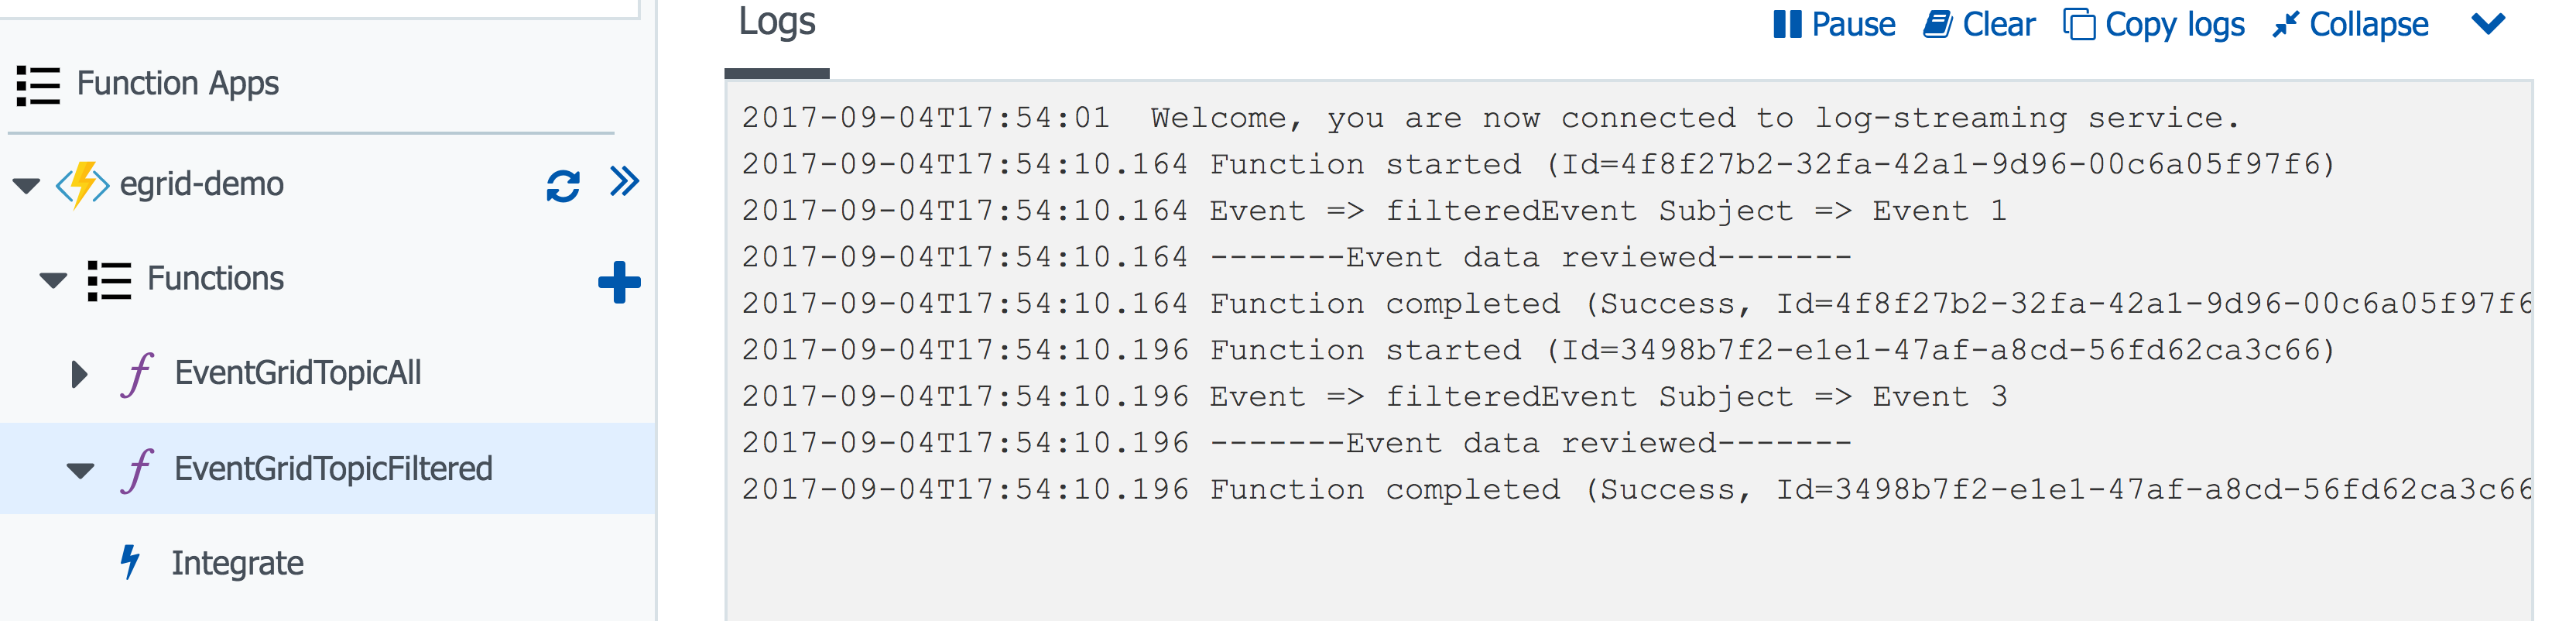
Instead of creating a new Web app to capture the webhook requests, we'll just use Azure Functions. We'll create a function app with two functions in it. One will be attached to our filtered Event Grid subscription and the other to the unfiltered subscription.
To keep it simple, we'll use the same code for both functions. The following code is what I wrote for the demo.
using System.Net;

public static async Task<HttpResponseMessage> Run(HttpRequestMessage req, TraceWriter log)
{
    var data = await req.Content.ReadAsAsync<IEnumerable<dynamic>>();
    foreach(var item in data) {
        log.Info($"Event => {item.EventType} Subject => {item.Subject}\n");
    }
    log.Info("-------Event data reviewed-------\n");

    return req.CreateResponse(HttpStatusCode.OK);
}
These functions were created using the HttpTrigger template. That will provide us with unique URL for each function. Keep note of those URLs since we'll need them when we create subscriptions.
Creating subscriptions
Subscriptions are what tell Event Grid what events on a topic that a subscriber would be interested in. When creating a subscription, you will need to provide an endpoint (the destination) to send the events to, and an optional set of filters.
For this post, we want to create two subscriptions; one with a filter and one without. We'll use the endpoints from the two functions we created above.
# no filters
az eventgrid topic event-subscription create
   --name SubAll
   --endpoint <func-url-1>
   --resource-group <resource-group-name>
   --topic-name <topic_name>
# filters
az eventgrid topic event-subscription create
   --name SubFiltered
   --endpoint <func-url-2>
   --resource-group <resource-group-name>
   --topic-name <topic_name>
   --included-event-types filteredEvent
These commands should complete fairly quickly, and now we'll have two subscriptions ready to receive events. Notice that the second call to the Azure CLI uses the --included-event-types flag to provide filters for the Event Grid topic. You can list out multiple event types separate by spaces.
Publishing events
With all this in place, we should be ready to send some events over to the topic. We will need the endpoint that was created for the topic and also the shared access signature (sas) key.
You can easily copy these from the Azure portal from the blade of the Event Grid topic. They can also be retrieved from the Azure CLI.
This command will return the topic endpoint along with some other basic information.
az eventgrid topic show --name custom-events -g netcore-eventgrid
This command will return the sas keys.
az eventgrid topic key list -g netcore-eventgrid -n custom-events
At this point, all that's left to do is to start issuing requests to the topic. The following code sets up an instance of HttpClient, creates the required headers, and sends a few events over to the topic.
string topicEndpoint = "<even-grid-topic-endpoint>";
string sasKey = "<sas-key>";

HttpClient client = new HttpClient();
client.DefaultRequestHeaders.Add("aeg-sas-key", sasKey);
client.DefaultRequestHeaders.UserAgent.ParseAdd("democlient");

List<GridEvent<object>> eventList = new List<GridEvent<object>>();
for (int x = 0; x < 5; x++)
{
   GridEvent<object> testEvent = new GridEvent<object>
   {
      Subject = $"Event {x}",
      EventType = (x % 2 == 0) ? "allEvents" : "filteredEvent",
      EventTime = DateTime.UtcNow,
      Id = Guid.NewGuid().ToString()
   };
   eventList.Add(testEvent);
}

string json = JsonConvert.SerializeObject(eventList);
HttpRequestMessage request = new HttpRequestMessage(HttpMethod.Post, topicEndpoint)
{
   Content = new StringContent(json, Encoding.UTF8, "application/json")
};

HttpResponseMessage response = await client.SendAsync(request);
You might have noticed that there's a simple toggle that alternates the values when the EvenType property is set. If you recall the subscriptions we created earlier, one of them included a filter for the filteredEvent event type. After running the code, we should see the event filtering work for our custom event.
Summary
Hopefully this post showed you how easy it was to get started with publishing and handling events in Azure Event Grid. Even though it's still in preview, the service looks very promising. I'm looking forward to seeing some of integrations that the product team and as well as the community end up creating.
If you'd like to hear more about the service, I've included some links below that you might find interesting.