Setting up Webpack in ASP.NET Core Pt.2

In the previous post, we went through the basics of setting up a Webpack bundle in a new ASP.NET Core application. In this post we'll continue exploring some of the other interesting things we can enable in Webpack.
Minifying Your Bundles
Bundling your scripts together is great for reducing the number of requests made on the initial load of your browser. Minifying your client side resources can also help performance by reducing file sizes which means smaller downloads for the browser. Let's see how we can setup minification in Webpack.
Make sure you have Webpack installed as a devDependency in your package.json file.
npm install webpack --save-dev
Now let's take a look at the webpack.config.js file.
var path = require('path');
var webpack = require('webpack');

module.exports = {
    entry: {
        main: './Scripts/main'
    },
    output: {
        publicPath: "/js/",
        path: path.join(__dirname, '/wwwroot/js/'),
        filename: 'main.build.js'
    },
    plugins: [
        new webpack.optimize.UglifyJsPlugin({
            minimize: true,
            compress: {
                warnings: false
            }
        })
    ]
};
The actual job of minification is handled by Webpack's UglifyJs plugin. You can further customize how the plugin does its job by setting additional properties in the configuration object. In the example above, we've turned off compress warnings and set minimize to true. You can find a list of available properties in the README on their GitHub page.
warnings:falsewill tell the UglifyJS plugin to not display warnings when dropping unreachable code or unused declarations etc.
Now run the webpack command in the terminal and you you'll see the generated main.build.js bundle has been minified. If you're continuing from the previous post, dotnet build will also invoke Webpack to generate a bundle.
Webpack Plugins
We just introduced a Webpack plugin to the configuration. Plugins typically add functionality by performing some action on your bundles. In the example above, the Uglify plugin was used to minify the generated main.build.js bundle. Webpack itself comes with tons of plugins, but there's also quite a few 3rd party ones available. If you're interested in building your own plugin, take a peek at their documentation. Let's take a look at another plugin.
Automatically Loaded Modules
Imagine you have a module that you need take a dependency on fairly often. Let's say you had jQuery installed as a NPM package and took a dependency on it across the different modules in your code. It might feel pretty tedious having to require('jquery') everywhere. Webpack's ProvidePlugin can help us it that. If we let the plugin know which module to load when a specific variable is used, it will load that module automatically. The following example shows how we can set this up with jQuery.
plugins: [
   new webpack.ProvidePlugin({
         $: 'jquery',
         jQuery: 'jquery',
         'window.jQuery': 'jquery'
     })
 ]
If one of those 3 key names are used in any of your JavaScript code, jQuery will be automatically imported. If you haven't done so already, install jquery via npm with
npm install jquery --save
Now instead of having to declare var $ = require('jquery'), we can just use $. We can also add other modules (your own or 3rd party) to the configuration object for the plugin. However, be careful not to overuse this plugin; especially with your own code. Too many automatically loaded modules can make testing and optimization difficult.
Multiple Entry Points
In the current setup, only the files in the main.js dependency tree will be included in the bundle. Imagine if we had multiple entry points; maybe one per major feature of your application. If you're building a multi-page application, you might have certain scripts that you want to reference only when those pages are loaded. You may also have features that you want to have lazy loaded.
We'll add some additional files to the Scripts folder; feature1.js and feature2.js. Imagine these files are independent features and represent the root of their own special section of your application.
Let's update the webpack.config.js file so it looks like the following.
var path = require('path');
var webpack = require('webpack');

module.exports = {
    entry: {
        main: './Scripts/main',
        feature1: './Scripts/feature1',
        feature2: './Scripts/feature2'
    },
    output: {
        publicPath: "/js/",
        path: path.join(__dirname, '/wwwroot/js/'),
        filename: '[name].build.js'
    },
    plugins: [
        new webpack.optimize.UglifyJsPlugin({
            minimize: true,
            compress: {
                warnings: false
            }
        })
    ]
};
The entry property has been expanded to handle two additional entry points. Also, notice that the filename in output is using the [name] template key. This key will be replaced by the name of the entry points that you specified in the entry property.
Running the webpack command, or dotnet build, will now generate 3 files; main.build.js, feature1.build.js, feature2.build.js.
Generating Hashes
One good practice when optimizing websites is to tell the browser to cache static files so it doesn’t have to re-request them every time the user decides loads a page. You can do this by setting the Cache-Control header for requests for static files made to your web server.
Now the concern becomes how do you let the browser know that there has been a change and the updated file should be downloaded. One useful technique we can implement is to append a version number or some form of unique hash to the file path. When updates are made, a new version number or hash will let the browser it needs to to download the latest file. This is actually pretty easy to setup in Webpack.
 output: {
        publicPath: "/js/",
        path: path.join(__dirname, '/wwwroot/js/'),
        filename: '[name].[hash].build.js'
    },
The only change made to the Webpack configuration file was to add a [hash] template key to the filename property. Running the build now will produce minified bundles with hashes in the file names. One downside of this is that we'll have to update the html tags to reference to new file name every time the hash changes. Let see how we can tackle this.
One approach we could take is to leverage Razor TagHelpers to generate the hashes for us.
With the link and script html tags, we can add the asp-append-version attribute and set its value to true. Now the Razor engine will automatically generate hash values and append it to the value of the src attribute for the tag. With this value set, we should remove [hash] template key in the webpack.config.js file. It's no longer needed since Razor will now do this at runtime.
Templating with the HtmlWebpack Plugin
Another approach we can take is to use the HtmlWebpackPlugin. We can pass this 3rd party plugin a template and it will generate a file with your bundles injected.
First install the plugin via NPM with the following command.
npm install html-webpack-plugin --save
The next think we'll need to do is create the template for this plugin to use. Let' assume that we want the scripts to get injected into the _Layout.cshtml. We're going to create a template of the _Layout.cshtml, let's call it _LayoutTemplate.cshtml, and tell Webpack where the files should go.
<!-- _LayoutTemplate.cshtml -->
<html>
<head>
    <meta charset="utf-8" />
    <meta name="viewport" content="width=device-width, initial-scale=1.0" />
    <title>@ViewData["Title"]</title>

</head>
<body>
    @RenderBody()

    <% for (var chunk in htmlWebpackPlugin.files.chunks) { %>
    <script src="<%= htmlWebpackPlugin.files.chunks[chunk].entry %>"></script>
    <% } %>

    @RenderSection("scripts", required: false)
</body>
</html>
The important part to notice here is inside the body tag where we are using ejs template syntax. The plugin uses ejs by default but you can switch to another if you like. Within the template, we loop over the generated bundles (or "chunks") and create script tags for each.
Now let's take a look at the webpack.config.js file.
var path = require('path');
var webpack = require('webpack');
var HtmlWebpackPlugin = require('html-webpack-plugin');

module.exports = {
    entry: {
        main: './Scripts/main',
    },
    output: {
        publicPath: "/js/",
        path: path.join(__dirname, '/wwwroot/js/'),
        filename: '[name].[hash].build.js'
    },
    plugins: [
        new HtmlWebpackPlugin({
          inject: false,
          template: 'Views/Shared/_LayoutTemplate.cshtml',
          filename: '../../Views/Shared/_Layout.cshtml'
      }),
    ]
};
Similar to other Webpack plugins we instantiate the HtmlWebpack plugin, pass it a configuration object, and add it to the plugins section. The inject option instructs the plugin to place your bundles at the bottom of the body tag. Since we want more control over where the bundles go, we are going to set this to false. template, as you can imagine, is the location of the template that will be used. filename refers to where the output should go; the _Layout.cshtml file. Notice that the path given to template is relative to the webpack.config.js file, while filename is relative to the output path; i.e. /wwwroot/js/.
Kicking of a build will now create the _Layout.cshtml file which should include the bundled modules along with their hashed file names.
Pulling out common dependencies
As your application grows, it's pretty likely that there will be modules that get used across multiple sections of your code. Webpack can figure out what your modules have in common and make a bundle just for that shared code. Let see how we can enable this with the CommonsChunk Plugin.
var path = require('path');
var webpack = require('webpack');
var HtmlWebpackPlugin = require('html-webpack-plugin');

module.exports = {
    entry: {
        main: './Scripts/main',
        commons:['jquery']
    },
    output: {
        publicPath: "/js/",
        path: path.join(__dirname, '/wwwroot/js/'),
        filename: '[name].[hash].build.js'
    },
    plugins: [
       new webpack.optimize.CommonsChunkPlugin({
            name: 'commons',
            minChunks: 2
        }),
        new HtmlWebpackPlugin({
            inject: true,
            templateContent: ' ',
            filename: '../../Views/Shared/_BundledScripts.cshtml'
        })
    ]
};
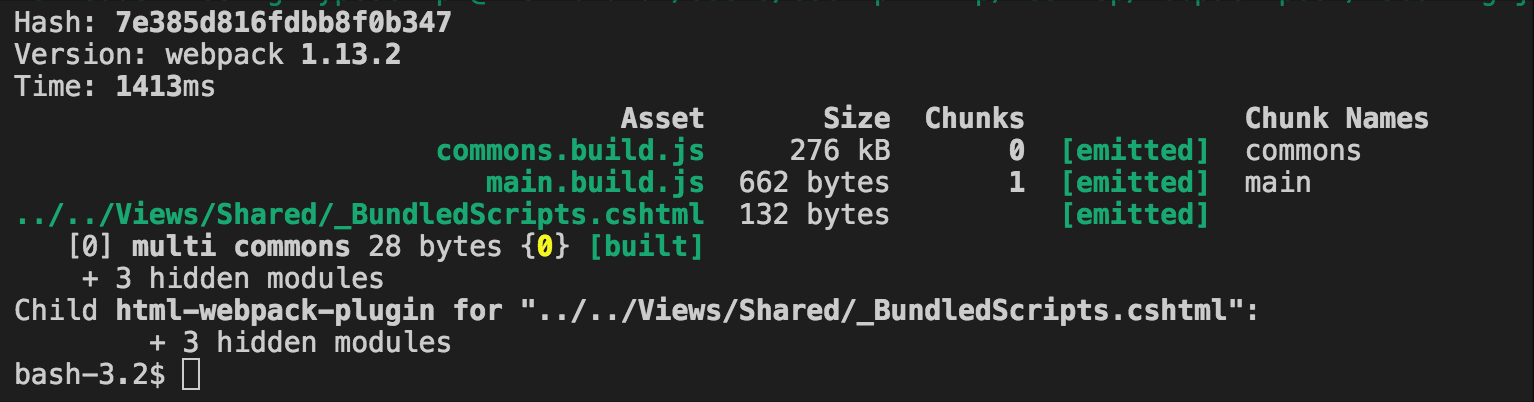
In the webpack.config.js file, we've added the CommonsChunkPlugin to the plugins array and passed in the configuration object. The value of the name property will be the name of the bundle that the plugin will use to load all of the common code. In the example above, we've included jquery but default. The minChunks property specifies the number of times a module is referenced before it's added into the commons bundle. In this case, if we reference a module 2 or more times, it'll get added into commons. Check out the official documentation for a listing of other options you can use.
On the next run of your build, there should be a commons.build.js alongside your main.build.js in the output folder.
Conclusion
Webpack has tons of configuration settings that we can tweak to help customize how bundles get created. In this post we looked at how to enable minification, how to create multiple bundles and and enabled a few plugins. I definitely encourage you to take a look at some of the other plugins created by the Webpack team and the community.